Note: After getting pretty close to completing the implementation of Steam Input into Ardenfall, I decided to forgo supporting it. I decided it wasn’t worth finishing, for now at least. Regardless, I think this post could still be useful for those who decide it’s worth it – specifically those who want “true” Steamdeck support with all of its bells and whistles.
~
When implementing controller support into Ardenfall, I got a rude awakening once I uploaded it to Steam – nothing worked! It took a bit of effort to get everything working again, to get Unity Input System and Steam Input to get along.
The Problem
Steam Input is a feature that is built into all steam games. You cannot turn it off by default (although players can turn it off individually).
When Steam Input detects a device it believes is not supported by your game (more info on that later), it will do a few things:
- If a non Xbox controller, it will disconnect it from Unity Input System, and reconnect it as a Steam Controller, on the steam side of things. At this point, Unity Input System has no idea this device exists.
- If an XBox controller, it will connect an additional Steam Controller device, resulting in two duplicate controllers. Unity Input System is aware of one, but not the other.
If you never activate the Steam Input SDK (But have Steam API initialized), then the device seems to be still be taken over, but always reconnected as a xbox controller, regardless of source.
What Steam Input Does
The goal of Steam Input is to have a flexible action system that allows for players to add their own controller support to any game ever. It has a ton of nifty features.
How it works for the developer: You create and register an action manifest file, which is a list of all the actions in the game. “jump”, “move”, and so on.
You then create controller configurations that map each of these actions to a controller input.
And then within unity or whatever engine you have, you check the controller for the action to see if it’s been pressed.
This is great! Except, its not. Its terrible. This basically means steam controllers are in its own little world, and unity’s input system becomes worthless for these controllers. This becomes a problem when you consider all of the fancy input system logic, like navigation timings, and everything.
But wait – what if we could create a virtual gamepad of sorts, plug that into unity input, then have steam actions trigger this virtual device?
That is exactly what I did.
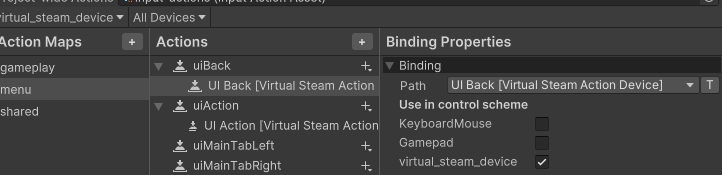
Virtual Steam Device
The goal here is: Steam Input -> Virtual Device -> Input System.
I created a “Virtual Steam Action Device”, where each button/value is an action. Jump, Look, Move.
You can see my implementation here.
Then I map this virtual device to my input settings.
And then during runtime, I go through each steam action, and plug the value into the device.
            if (SteamManager.Initialized && currentDeviceType == InputDeviceType.GamepadSteam)
            {
                UpdateSteamVirtualButton("uiBack");
                UpdateSteamVirtualButton("uiSelect");
                UpdateSteamVirtualButton("uiAction");
            }
....

        private void UpdateSteamVirtualButton(string controlId)
        {
            if(!digitalActionHandles.TryGetValue(controlId, out var handle))
            {
                Debug.LogError($"InputSystem :: Expected steam action {controlId}, but it does not exist");
                return;
            }

            var state = SteamInput.GetDigitalActionData(CurrentSteamGamepad, digitalActionHandles[controlId]);
            virtualSteamGamepad.SetButton(controlId, state.bState == 1);
        }
You will of course need to then set up your action manifest file with all the actions defined. Check out Steam’s Documentation on that.
The benefits to this approach are pretty big: Everything, from non steam controllers, to mouse and keyboard, to steam controllers, goes through the unity input system. This means VERY little additional work. It’s like magic!
Originally I intended to have a single action set and all bindable possibilities at once. While you can bind multiple actions to a button, you cannot bind multiple actions to a joystick. So I ended up using a combination of layers and action sets to get this working.
Determining Active Device
Generally you want to keep track of the active device. In my case, I use it for glyphs, and some UI logic (I show selection boxes when a controller is active, but hide it when using a mouse).
To do this, every frame I:
1) Check if current device is disconnected.
2) If either disconnected or I’ve received input from any steam controller this frame (I loop each action and see if the value is different), then set active device to this steam controller.
3) If either disconnected or I’ve received input from any unity gamepad this frame, then set active device to this gamepad.
4) If either disconnected, there is no active device, or I’ve received input from mouse or keyboard, then set active device to mouse and keyboard.
Convincing Steam to NOT use Steam Input
For me, at least by default, I’d rather not use steam input at all unless necessary. I have my own remapping, its cool and doesn’t require extra knowledge.
So here’s how to make your XBox / Playstation controllers to NOT use Steam Input.
- In the Steamworks ‘Steam Input’ page, make sure the controller is NOT toggled on in ‘Opt Controllers into Steam Input’.

- In the Steam Store ‘Basic Info’ page, define support for controllers using the ‘Controller Support Wizard’. Make sure to say you fully support the controllers you wish to not have Steam take over. Note: Steam says one of the requirements for.
- Once you upload the game, check out the result in the steam overlay. It should say your controller is fully supported. If it says partial, you need to make sure you said the controllers are fully supported in the wizard.
Glyphs
Glyphs aren’t too bad. For Ardenfall there’s two types of glyphs – RawImage and Spritesheet glyphs. The former is simply displaying a single icon somewhere in the UI, and the latter is a more complex spritesheet that is displayed within TextMeshPro text. The spritesheet is built at runtime, either collecting all icons for the mouse and keyboard, a non steam controller, or steam controllers. The former just uses local images mapped to key codes, and the latter relies on Steam’s glyph requester.
Since there’s no way to hook into the player changing actions, I manually read glyph paths, and compare to my cached ones. If any change, then I update my glyphs. Hacky, but that’s the name of the game when dealing with Steam input.
Limitations
Remapping
You cannot use Unity Input System remapping for these steam controllers. This is because the controller remapper is remapping gamepad stuff, and steam input isn’t using a unity gamepad. For me, the solution was to simply detect that the active device is a steam device, and put a warning that the remapping doesn’t work, you’ll need to remap in the steam input settings, or disable steam input and restart the game.
Action Map Resets
Unlike with Unity Action Maps, Steam Input System does not reset controller state when switching Action Sets. This introduces problems, such as this example:
- User presses the ‘Start’ Key, which is mapped to ‘Open Inventory’. The inventory opens.
- When the inventory opens, and the action map is changed to ‘UI”
- The ‘Start’ Key is now mapped to ‘Back’. The start button is still being held down, so now its counted as pressing back!
My solution was whenever a action set would change, I would check the state of all buttons, and add any that are pressed down to a list. I would then tell unity input that these buttons are no longer down. Then whenever I update the virtual device, if the input value is pressed down, I only update the input system state once an input value is tracked as up.
Other Findings
- If you initialize the steam SDK, but don’t run the game through steam itself (ie just run the executable) and steam thinks your controller isn’t supported, then it will cause your controllers to just… not work. So for local dev builds, you have to upload the game and test it within steam, or disable the steamworks sdk initialization.
- If the player disables or enables steam input from the overlay menu while playing, it will not resolve itself (steam devices disconnect, but never reconnect as non steam devices). I haven’t found a solution for this. There’s also no way as far as I know to detect that the user has turned on and off steam input.
Resources
- This post by Al. Lopez is by far the best information on Steam Input I could find. Seriously, read it.
- My Steam Virtual Input sourcecode
- Steam Action Manifest Documentation
And That’s That
Hopefully this post sheds some light on the mysteries of Steam Input. I think there’s a pretty good reason so few games officially support Steam’s Input System – it is pretty detached from existing input systems, has odd quirks, and can be tough to develop with, especially action manifest caching and other spooky stuff.
And that’s it! Bye.